Adding Layers and Depth To An Outdoor Space: How To Design A Multi-Level Landscape
Posted by Jason Wyrwicz on Oct 24th 2025
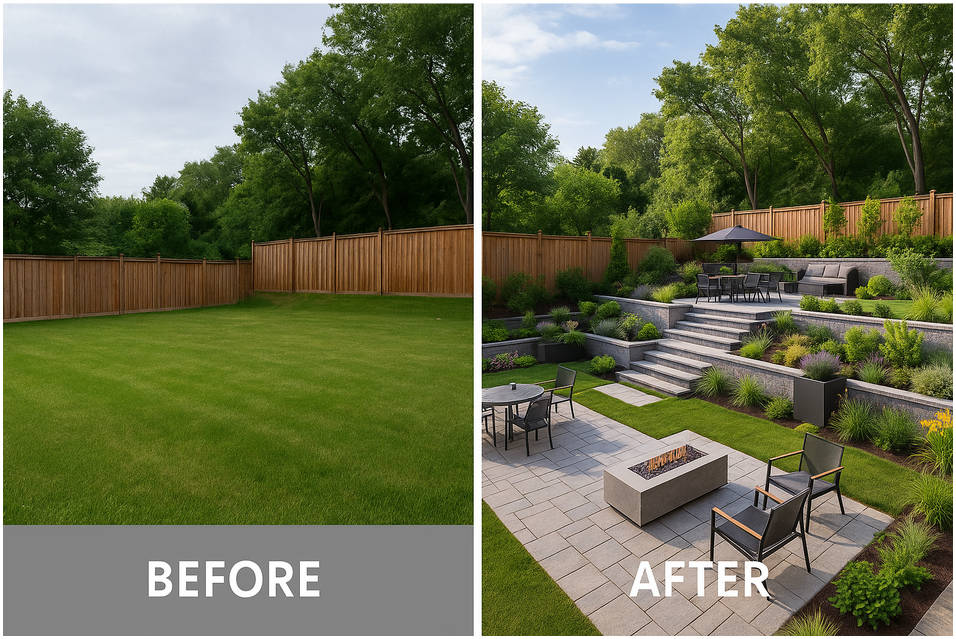
A flat backyard that’s tidy, open, and maybe a bit empty is fine. But with a few smart upgrades, it can become something much more inviting. You start to notice structure forming, patterns taking shape, and the whole view gaining a stronger visual appeal.
Add a few levels, and suddenly it has dimension. You gain texture, better flow, and defined areas for different activities without crowding one spot. That’s the beauty of a multi level backyard; it turns plain ground into a space that’s organized, practical, and full of character.
In this guide, you’ll learn how to plan and design a multi-level landscape step by step. You’ll also see how to assess your terrain, map out functional zones, and bring everything together with the right mix of plants, materials, and lighting.
Why Multi-Level Landscapes Work So Well
Building upward instead of just spreading out changes everything. The yard feels more alive. Layers create contrast and draw your attention to what matters. Even a slight rise or terrace adds interest.
Here’s why multi-level landscaping works so beautifully:
- Natural “Zones” for Living: Each level can serve a different purpose. For instance, you can have an area for lounging, another for dining, a third for gardening or play. This natural zoning turns your yard into a series of outdoor rooms, making the space more usable and enjoyable.
- Visual Depth and Interest: Layering adds dimensional interest that a flat yard simply can’t match. Varying elevations create eye-catching viewpoints, making the space feel larger and more complex than it is.
- Improved Drainage and Stability: From a practical standpoint, sloped multi-level backyard landscaping can solve problems on hilly properties. Terraces act like steps that halt erosion by breaking a steep grade into smaller, flat pieces. This minimizes soil runoff and encourages rainwater to soak in or drain in a controlled way, instead of cascading straight toward your house.
- More Planting Opportunities: Every level of a tiered garden offers new spots to plant. You can have an upper patio with container plants, a middle layer of flower beds, and a lower level with a small lawn or trees. This increases your green space and allows diverse plant groupings suited to each micro-environment (sun-loving on top, shade-tolerant below). The result is a richer, lusher landscape overall.
- Enhanced Aesthetics & Home Value: A well-designed multi-level yard has the “wow” factor. The combination of terraces, retaining walls, and steps can create a stunning focal point for your property. This kind of outdoor makeover not only expands your living area but can also boost curb appeal and property value due to its unique beauty and functionality.
How to Design a Multi-Level Landscape Step by Step
Creating a layered outdoor space takes more than stacking a few decks or terraces. It’s about shaping your yard in a way that feels natural, easy to move through, and balanced in height and texture.
Each step in the process helps you build structure and flow without losing that relaxed, lived-in look.
Here’s how you can start shaping your own multi-level backyard into something beautiful and practical.
Step 1 – Analyze Your Space & Terrain
Before you grab a shovel or start sketching designs, take a moment to really look at your yard. Every slope, patch of shade, and walkway affects how your multi-level landscape will come together. It’s the foundation of the whole project.
Walk the space at different times of day. Notice where the sun hits longest, where shadows sit, and which spots stay damp after rain. Try to picture how people move through it; the paths they’d take from the house to the garden or patio. Once you understand the layout, it becomes much easier to plan what goes where.
Here are a few simple things to check before you start building:
|
Element |
What to Look For |
Why It Matters |
|
Slope |
The direction and steepness of the land |
Steeper slopes may need retaining walls or tiered levels for safety and drainage |
|
Sunlight |
How light changes through the day |
Affects which plants will thrive and where seating or shade structures fit best |
|
Access Points |
Walkways, doors, or gates |
Helps connect each level so movement feels natural |
|
Drainage |
Where water collects or flows |
Prevents erosion and keeps your plants healthy |
Once you’ve mapped out these details, sketch a rough plan or use a free 3D landscaping tool to visualize it. Don’t worry about precision; this part’s about getting a feel for your space. The goal is to work with your yard’s natural shape, not against it.
Step 2 – Plan Functional Zones for Each Level

With a solid understanding of your terrain, you can start dreaming up what each level will be. Think about how you want to use each of those outdoor spaces.
Here are some typical zones and multi-level backyard ideas:
- Upper Level: Often closest to the house, the top tier is perfect for entertaining. Many designs feature an elevated deck or patio here, extending your indoor living space outward. This could be your lounge area or dining area.
- Middle Level: If you have room for a tier in between top and bottom, this space can serve as a transition and greenery zone. It might be a garden terrace where you build planting beds or a lawn patch. This mid-tier can also host a secondary seating nook or a play area for kids.
- Lower Level: The bottom tier often ends up as the most secluded or specialized zone. Since it’s set apart, it’s great for features that benefit from a sense of privacy or separation. A popular choice is a fire pit lounge, but it also could be a kids’ play zone, a meditation or spa corner, or even a vegetable garden if it’s the only spot that gets full sun. In sloped backyards, the lowest level is sometimes at the back fence line; you could create a private reading bench or a shaded pergola.
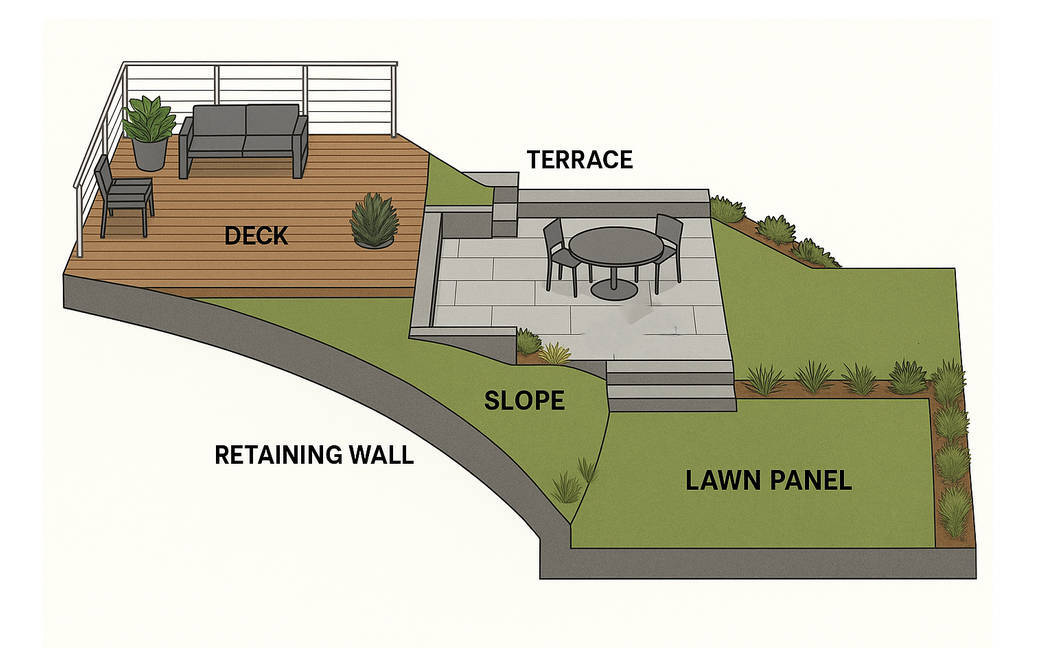
Step 3 – Add Layers with Retaining Walls, Stairs & Platforms
Once you have a solid plan for what goes where, it’s time to get building, or at least, design the structural elements that will physically create those levels.
In a multi-level landscape, your best friends are retaining walls, stairs, and occasionally raised decks or platforms.
These are the bones of your tiered yard, literally holding up the earth and connecting the different heights.
Here’s how to approach this stage:
- Retaining Walls: These are structures that hold back soil to form your terraces. The type of retaining wall you choose will depend on your aesthetic preference, budget, and how tall the wall needs to be.
- Stairs & Pathways: Equally important as the walls are the stairways or paths that link your levels. Well-designed stairs make moving through your multi-level yard safe and convenient, and they can be an architectural feature in themselves.
- Platforms & Decks: In some multi-level designs, not every level is earth and stone. You might have a raised deck or platform as one of your tiers. For example, a backyard multi-level deck might consist of a wooden deck off the house (upper level), stepping down to a paver terrace (middle level), then down to a ground-level gravel fire pit area (lower level).
Step 4 – Use Planters, Greenery & Textures to Soften Hardscapes
After the heavy construction is done, now it’s time to bring in the softness and life: plants, planters , and other textural elements that will transform those hard terraces into a lush paradise.
Greenery is what truly makes each level inviting and cohesive with the natural environment.
Here are strategies to green up and beautify your multi-level landscape:
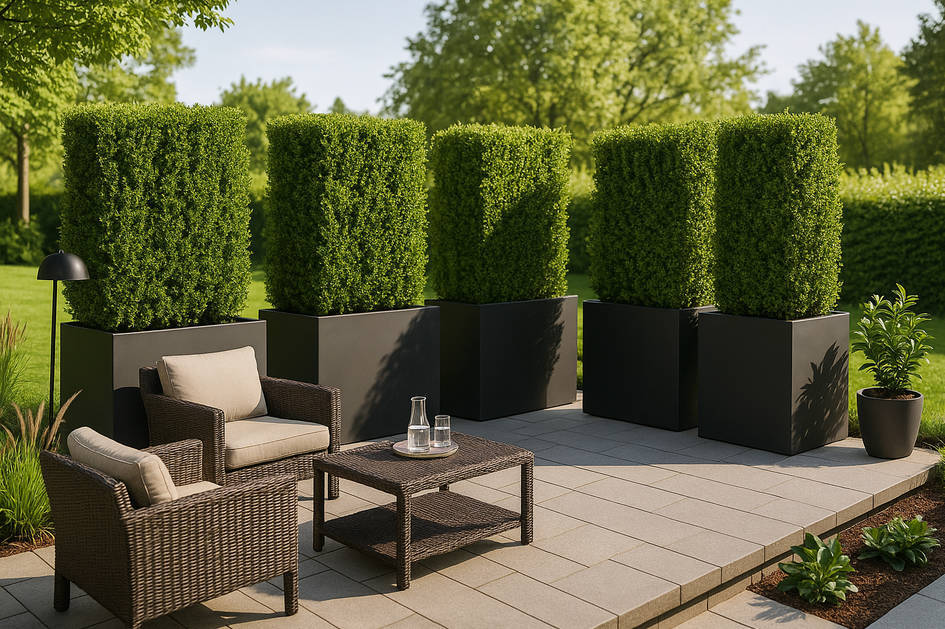
- Soften Hard Edges with Planters: Multi-level yards often involve a lot of hardscape (wood, concrete, stone). Planters are an ideal solution to break up large surfaces and add organic shapes. For example, you can place a row of tall rectangular planters along the edge of a deck or patio to act as a green privacy screen and windbreak.
- Create Cascades of Green: Take advantage of the different levels by strategically planting trailing vines and flowers to drape over the edges, softening the hard lines of the walls.
- Pick Your Planters Thoughtfully: When choosing planters, consider the style and color that will complement your design. Modern multi-level backyard landscaping often uses sleek metal or fiberglass planters with clean lines to match contemporary terraces. For example, a grouping of matte black planters filled with lush green foliage can anchor a modern design, providing stark contrast against light stone or wood decks.
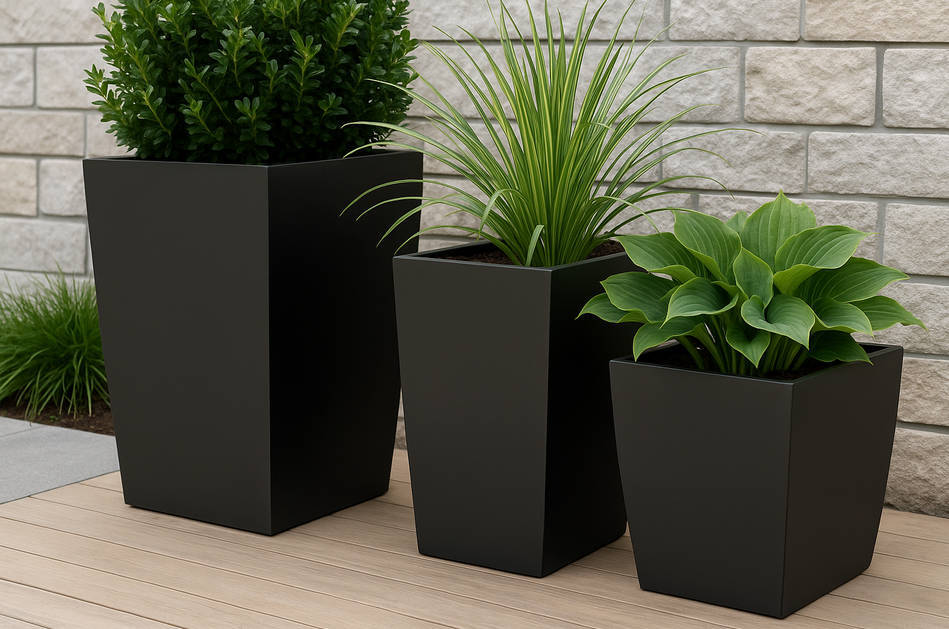
- Tall, Medium, Low – Layer Your Plants: Achieve a “layered landscape” on each level by including plants of varying heights and textures. Along a tiered backyard slope, you might plant tall shrubs or small trees at the back (against a fence or wall), mid-sized flowering plants in front of them, and groundcovers or low edging plants at the front. This foreground-middle-background planting creates depth even within a single terrace.
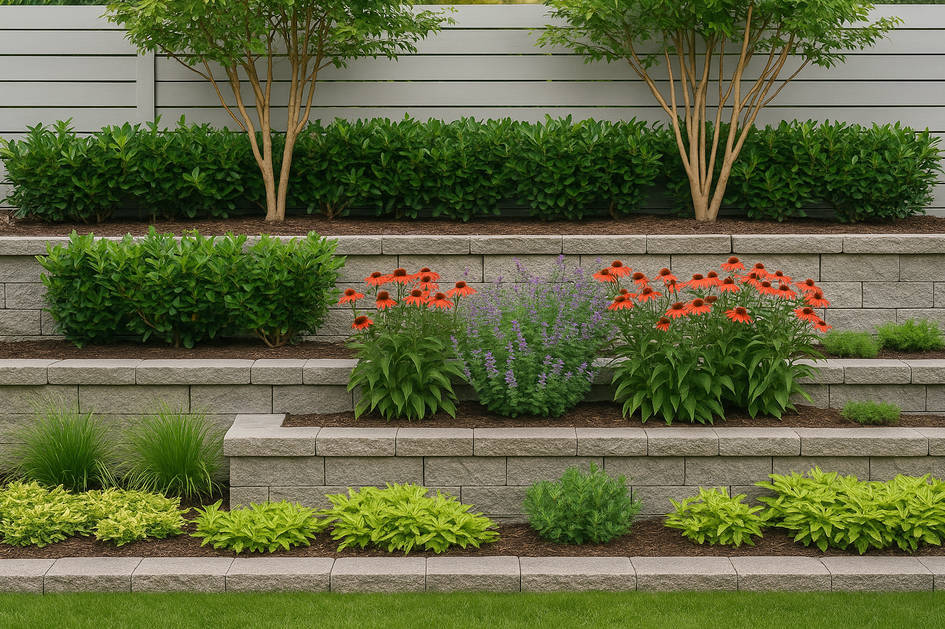
- Privacy and Views: If privacy is a concern, use plants strategically on your tiers. Trees or tall hedges can be planted on a lower level to screen views upward. Or place tall planters with bamboo or arborvitae on an upper deck to block sight lines into your space.
Step 5 – Connect Levels with Visual & Material Consistency
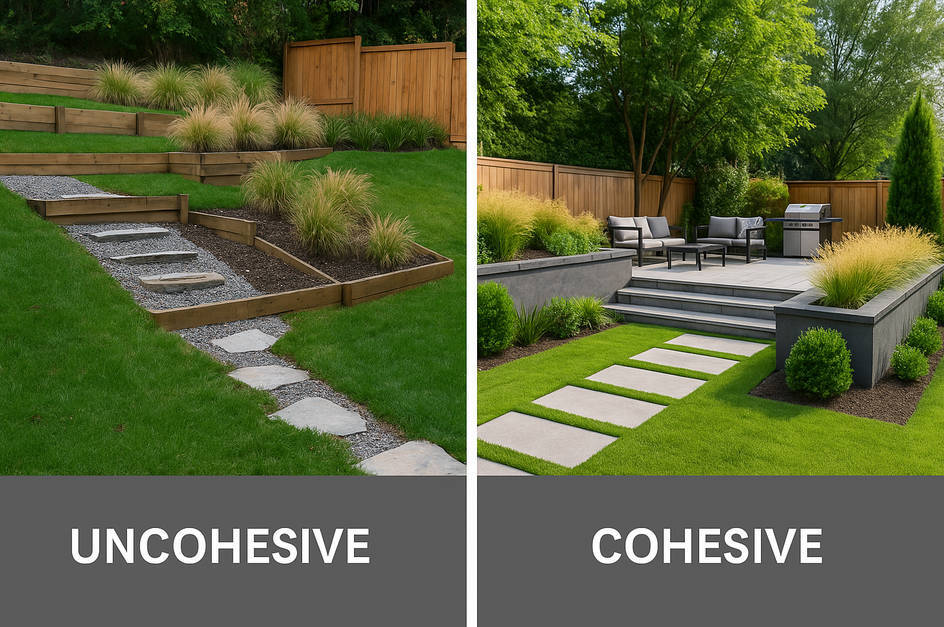
At this point, you’ve defined your zones, built the structure, and added plants and planters. Each level likely has its own character, but to make the entire backyard feel like one cohesive environment, you need to connect the levels visually and materially. Here’s how to do that:
- Repeat Key Materials: One of the simplest ways to unify the look of different levels is to use the same or complementary materials on each. For example, if your top level has bluestone pavers, consider using those same bluestone pavers as step treads or as a border on the lower gravel patio.
- Create a Cohesive Color Scheme: Beyond structural materials, consider the color scheme of your outdoor decor. Choose a color palette for furnishings, cushions, planters, and even flowers that carries through the levels.
- Mind the Lines: Pay attention to the lines and shapes in your design, and maintain them through the project. If your top deck has a curved edge, perhaps mirror that curve in the patio outline on the next level down. Aligning edges and centering features can create a pleasing sense of order.
- Consistent Lighting Style: Don't just think about where the light goes; think about the fixture's style. Using the same look for all your lights, for example, carrying sleek black metal sconces from the top wall down to similar black path lights on the lower patio, will instantly unify all the different levels.
- Tie Levels Together with Landscaping Elements: One trick to unify multiple levels is to feature certain plants or decorative elements that appear on every level. For instance, if you choose ornamental grasses as your theme, plant them in a planter on the upper deck, along the mid-level wall, and near the fence on the lower patio.
- Maintain Sightlines and Flow: To keep the space from feeling disjointed, focus on how you move and what you see. Keep pathways wide and welcoming between levels. Create intentional vistas (framed views) so that from the upper deck, you can clearly see the area below, connecting the spaces visually.
Step 6 – Nighttime Ambience & Final Touches
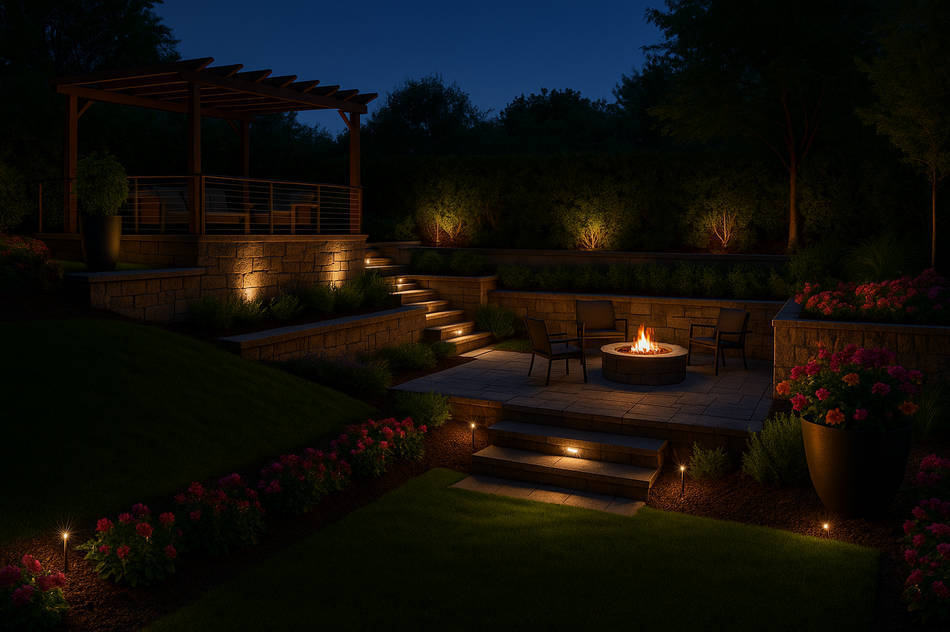
Designing a multi-level landscape isn’t just a daytime affair; you want it to shine (literally) in the evenings too. So here are some key considerations:
- Layered Landscape Lighting: To enjoy your outdoor spaces after dark, incorporate a mix of lighting types on each level. A good plan balances function (safety and visibility) with ambience (warmth and mood).
- Focal Points & Features: Consider adding one or two special features that serve as focal points and enhance the experience of your backyard, like fire pits, water features, and sculptures.
Tip: To truly maximize your multi-level landscape, plan for all seasons. This includes plant choices and functional elements, like a covered deck or a shaded pergola for rain or summer heat.
Pro Tips From Landscape Designers
Designing a multi-level landscape can feel like a big project, so it’s wise to take advice from the pros. Here are a few expert tips to keep in mind as you plan and implement your tiered outdoor space:
“Start with the furniture layout to define each space before you build. It ensures your patios and decks are sized right for their function.”
“Consistency across levels is key to seamless flow, so repeat materials, colors, or plants on every tier such that the design feels unified.”
“Use the same style of lighting and decor accents on each level. It creates a visual link that makes multiple levels read as one cohesive design.”
In Summary
A multi-level backyard gives you the freedom to shape your space with more character and depth. By adding height and structure, you can turn a plain yard into a series of inviting zones. Furthermore, terracing improves drainage, makes better use of space, and can even increase your property’s value.
If you’re ready to start, start small. Sketch your layout, build one level at a time, and let your design grow naturally. Even adding a few raised planters or a short retaining wall can change how your yard looks and feels.
And when you’re ready to style it, check out our outdoor planters for durable pieces that fit your design. With each addition, your yard can transform into a connected outdoor retreat that unfolds beautifully, level by level.

: Sizes, Materials, Layouts & Maintenance")

